Rāda ziņas ar etiķeti polyester. Rādīt visas ziņas

07.05.12

Covering midbass pods with cloth

     In this post I will describe steps that I have done to build cover-ups for midbass speakers in my car. Here you can see how I made midbass speaker pods in the front doors of my car. As you can see, these pods look awful although they are very useful for any car audio installation. In this post I'll try to make them less ugly not to say "good looking". :)

     Since I have some minor experience working with fiberglass, it was decided, that the covers for pods will be made out of fiberglass because you can get whatever forms you like. The technology or the way to make them can be very different. It depends on the door trim itself, your skills and desire to ruin few days of your life. Different styles can bee seen on the Internet. If you want to have interior of the car as original as it could be, it is possible to have the pods be built in the door trim so it looks like factory made. It requires a lot of skills, material and fabrics selection etc.

      I went the easy way. 

     The first step is to take food film, fold it in several layers and attach that film over the speaker pod. You should align the film on every curve and edge of the pod. The film it self can be fixated with some paper tape or something that wouldn't allow the film to move out of the correct position. This is done to protect the door trim from resin that will be used to glue fiberglass while replicating curves and form of the pod.
     Unfortunately I didn't take a picture of this process. But I think you get the idea. Be extra careful to cover all of the pod and its surroundings, because if the resin (glue) will touch the door trim, you won't be able to clean it off.

     The next step is to apply glue (resin) and fiberglass squares so you would have fiberglass form of the speaker pod. I have described in details how to handle fiberglass and resin, so I won't do it again. You can look for older posts in this blog. If you are very talanted, you might apply fiberglass with one try and get the perfect form. I wasn't, so I was prepared to apply another layer of fiberglass afterwards.
     After few hours or minutes (depending on the proportions of resin vs hardener) you can peal off the food film with fiberglass cover and cut off the excess fiberglass.
This is how it looked for me:

       
      As you can see, it is far from perfect. But with the next layers of fiberglass I made the form to look as it should be (in my opinion).

     
      After I got the form right, it was time to cover it with cloth.
      I chose Alcantara "wannabe" cloth (something like suede).
      In this step I will not go in to details as it is described in my previous posts (Tweeter podiums).
     The only difference is with the stitching where cloth made wrinkles. Covering tweeter pods I sew cloth peaces together. This time I used only glue. And it turned out better then I suspected. 


After that speaker pod cover was attached to the wooden ring fo the speaker pod with few screws.


23.03.11

Tweeter pods: step #2

     Next step of making tweeter pods is to level the surface using filler. The filler must be intended for car repairs, because it is very resistant and it stays on the fiberglass. The car filler also has two components, so proportions of hardener should be read on the car filler label.
     I won't teach you how to apply filler, because that skill comes with lot of training. At the following pictures I only started to learn my way of applying filler. The idea is simple - you put on filler on the fiberglass trim that we created in the last blog post. When it has hardened enough, you have to use sandpaper to get rid of unevenness. I should add that the surface of the fiberglass trim should be smooth although if there are small dents don't bother - when cloth/leather will be applied afterwards, these dents won't be seen.
So this is what the fiberglass trim looks after applying filler:


     And after sanding:


      By now you should understand that when using sandpaper, wear respirator, because the dust from fiberglass and car filler can be bad for your health. And this is not bullshit. Small glass particles can stay in you lungs for a very long time if not even forever.


      Now starts the most difficult part - getting the angle of tweeter. 
This is how I did it:
1. Place the fiberglass trim in to car so it would fit as original. Then place tweeter in the chosen height and place a mark on the trim where tweeter should be. At this point it is important only to get the height (we will have tweeters at eye-sight level).
2. You should find appropriate back cover for tweeters. Usually they come together in the speaker kit. So you have to get cover that would be suitable for placing within a surface. Let me give an example:


This is NO NO, because with this back cover tweeters can be placed on car panel:
This is the thing were looking for:
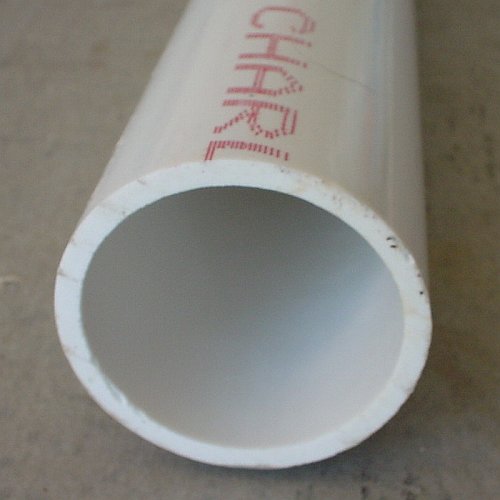
3. You have to find some peace of PVC pipe or similar to work as a form for tweeter. The most difficult part is finding pipe that would have the necessary diameter. 
Let me illustrate why the PVC, and how to measure correct size:


     As you see from picture, the PVC pipe diameter should be enough to include not only tweeter size, but also decorative leather/cloth thickness. 

    When the necessary PVC pipe has been found you should cut off about 3 cm (approx the height of tweeter itself). Afterwards you should attach it at the marked point on your fiberglass trim. How to attach it? I used rivets. But it was only because it was OK for me. In other cases there might be too little space between inner diameter of PVC pipe and fiberglass trim to put in tweeter.

4. Now about getting the right angle for the tweeters. At this point you should already know in what angle tweeters should point in your car. So now take some kind of wire (I used copper). Attach it to the PVC ring from behind (drill a small hole in PVC). This wire will be used to lean the PVC pipe in the correct angle and then attaching the other end of the wire on the fiberglass trim. 
Like this:


Unfortunately I didn't take a picture of it, but in the next pictures you will be able to understand it.

5. When the angle has been adjusted, you have to get lady tights. They are made of nylon and are very stretchy. So when we apply them over our construction, natural smooth curves and lines appear.


      Try to fixate the tights in place with some duck tape. After that apply polyester resin (glue) on the tights, than apply fiberglass (preferably small squares) and don't press hard because you can ruin the shape.


       When glue has hardened, cut off the unnecessary parts of the tights as you see in picture above. 
Then it's time to apply car filler again. And sanding.... And filling..... And sanding...


New updates will follow...